AssemblerUI
Enum for determining the interface that is used by developers to create, configure, and manage assembler UI tools. The assembler UIs include:
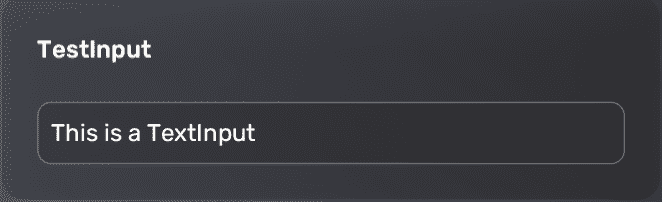
TextInput
A field where the user can input text
Preview
Code samples
-- Load the built-in assembler module in the header code
require("assembler")
-- Declare an empty table to store all assembler UI elements
-- Every new assembler UI element needs to be inserted into the 'actions' table separately
local actions = {}
-- Declare a variable "testValue" to store the user input value
local testValue

-- Render all UI elements in the 'actions' table
function render()
        -- Create a new TextInput UI element with a default value of "This is a TextInput" and make the UI element read-only
        local TextInput = assembler:New("TestInput", AssemblerUI.TextInput)
        TextInput.defaultValue = "This is a TextInput"
        TextInput.readonly=true

        -- Define the action to take when the user interacts with the TextInput UI element
        -- This will store the user's selection in the "testValue" variable for later use
        TextInput.Action = function ()
            testValue = TextInput.GetInput()
        end

        -- Add the TextInput UI element into the "actions" table for execution
        table.insert(actions, TextInput)

 -- Start to render all UI elements in the "actions"  table
    for k, v in ipairs(actions) do
        v:Render(k)
    end
end

-- Execute all UI elements in the "actions"  table
function execute()
    print('start execute')
    -- Start to execute all Action methods of assembler UI elements after the user clicks 'Assemble'
    for k, v in ipairs(actions) do
        v.Action()
    end

    -- Logic part
end
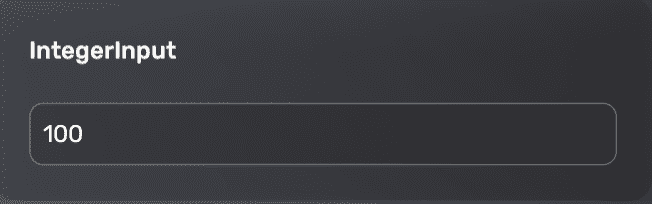
IntegerInput
A field where the user can input an integer
Preview
Code samples
-- Load the built-in assembler module in the header code
require("assembler")
-- Declare an empty table to store all assembler UI elements
-- Every new assembler UI element needs to be inserted into the 'actions' table separately
local actions = {}
-- Declare a variable "testValue" to store the user input value
local testValue

-- Render all UI elements in the 'actions' table
function render()
        -- Create a new IntegerInput UI element with a default value of 100
        local IntegerInput = assembler:New("IntegerInput", AssemblerUI.IntegerInput)
        IntegerInput.defaultValue = 100

        -- Define the action to take when the user interacts with the IntegerInput UI element
        -- This will store the user's selection in the "testValue" variable for later use
        IntegerInput.Action = function ()
            testValue = IntegerInput.GetInput()
        end

        -- Add the IntegerInput UI element into the "actions" table for execution
        table.insert(actions, IntegerInput)

 -- Start to render all UI elements in the "actions"  table
    for k, v in ipairs(actions) do
        v:Render(k)
    end
end

-- Execute all UI elements in the "actions"  table
function execute()
    print('start execute')
    -- Start to execute all Action methods of assembler UI elements after the user clicks 'Assemble'
    for k, v in ipairs(actions) do
        v.Action()
    end

    -- Logic part
end
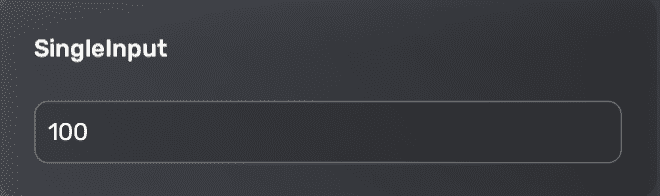
SingleInput
A field where the user can input a single number, either an integer or a decimal
Preview
Code samples
-- Load the built-in assembler module in the header code
require("assembler")
-- Declare an empty table to store all assembler UI elements
-- Every new assembler UI element needs to be inserted into the 'actions' table separately
local actions = {}
-- Declare a variable "testValue" to store the user input value
local testValue

-- Render all UI elements in the 'actions' table
function render()
        - Create a SingleInput UI element with a default value of 100
        local SingleInput = assembler:New("SingleInput", AssemblerUI.SingleInput)
        SingleInput.defaultValue = 100

        -- Define the action to take when the user interacts with the SingleInput UI element
        -- This will store the user's selection in the "testValue" variable for later use
        SingleInput.Action = function ()
            testValue = SingleInput.GetInput()
        end

        -- Add the SingleInput UI element into the 'actions' table for execution
        table.insert(actions, SingleInput)

 -- Start to render all UI elements in the "actions"  table
    for k, v in ipairs(actions) do
        v:Render(k)
    end
end

-- Execute all UI elements in the "actions"  table
function execute()
    print('start execute')
    -- Start to execute all Action methods of assembler UI elements after the user clicks 'Assemble'
    for k, v in ipairs(actions) do
        v.Action()
    end

    -- Logic part
end
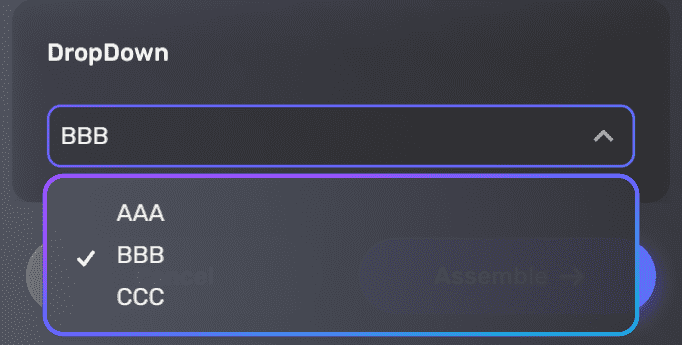
Dropdown
A list of options from which the user can choose one
Preview
Code samples
-- Load the built-in assembler module in the header code
require("assembler")
-- Declare an empty table to store all assembler UI elements
-- Every new assembler UI element needs to be inserted into the 'actions' table separately
local actions = {}
-- Declare a variable "testValue" to store the user input value
local testValue

-- Render all UI elements in the 'actions' table
function render()
        -- Create a new DropDown UI element with a default value of "BBB" and options {"AAA", "BBB", "CCC"}
        local DropDown = assembler:New("DropDown", AssemblerUI.DropDown)
        DropDown.defaultValue = "BBB"
        DropDown.options = {"AAA","BBB","CCC"}

        -- Define the action to take when the user interacts with the DropDown UI element
        -- This will store the user's selection in the "testValue" variable for later use
        DropDown.Action = function ()
            testValue = DropDown.GetInput()
        end

        -- Add the DropDown UI element into the "actions" table for execution
        table.insert(actions, DropDown)

 -- Start to render all UI elements in the "actions"  table
    for k, v in ipairs(actions) do
        v:Render(k)
    end
end

-- Execute all UI elements in the "actions"  table
function execute()
    print('start execute')
    -- Start to execute all Action methods of assembler UI elements after the user clicks 'Assemble'
    for k, v in ipairs(actions) do
        v.Action()
    end

    -- Logic part
end
Toggle
A switch that can be turned on or off
Preview

Code samples
-- Load the built-in assembler module in the header code
require("assembler")
-- Declare an empty table to store all assembler UI elements
-- Every new assembler UI element needs to be inserted into the 'actions' table separately
local actions = {}
-- Declare a variable "testValue" to store the user input value
local testValue

-- Render all UI elements in the 'actions' table
function render()
        -- Create a new Toggle UI element with a default value of "true" and options {"This is a Toggle"}
        local Toggle = assembler:New("Toggle", AssemblerUI.Toggle)
        Toggle.defaultValue = true
        Toggle.options ={"This is a Toggle"}

        -- Define the action to take when the user interacts with the Toggle UI element
        -- This will store the user's selection in the "testValue" variable for later use
        Toggle.Action = function ()
            testValue = Toggle.GetInput()

        -- Add the Toggle UI element into the "actions" table for execution
        table.insert(actions, Toggle)

 -- Start to render all UI elements in the "actions"  table
    for k, v in ipairs(actions) do
        v:Render(k)
    end
end

-- Execute all UI elements in the "actions"  table
function execute()
    print('start execute')
    -- Start to execute all Action methods of assembler UI elements after the user clicks 'Assemble'
    for k, v in ipairs(actions) do
        v.Action()
    end

    -- Logic part
end
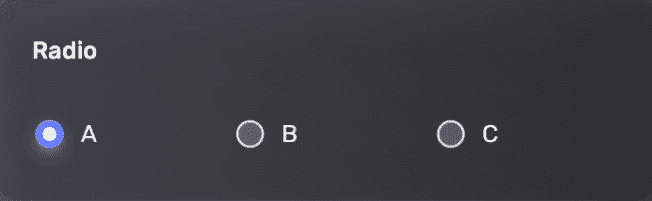
Radio
A set of options from which the user can choose one. These options are displayed as radio buttons
Preview
Code samples
-- Load the built-in assembler module in the header code
require("assembler")
-- Declare an empty table to store all assembler UI elements
-- Every new assembler UI element needs to be inserted into the 'actions' table separately
local actions = {}
-- Declare a variable "testValue" to store the user input value
local testValue

-- Render all UI elements in the 'actions' table
function render()
        -- Create a new Radio button UI element with a default value of "On" and options {"A", "B", "C"}
        local Radio = assembler:New("Radio", AssemblerUI.Radio)
        Radio.defaultValue = "On"
        Radio.options = {"A", "B","C"}

        -- Define the action to take when the user interacts with the Radio button UI element
        -- This will store the user's selection in the "testValue" variable for later use
        Radio.Action = function ()
            testValue = Radio.GetInput()
        end

        -- Add the Radio button UI element into the "actions" table for execution
        table.insert(actions, Radio)

 -- Start to render all UI elements in the "actions"  table
    for k, v in ipairs(actions) do
        v:Render(k)
    end
end

-- Execute all UI elements in the "actions"  table
function execute()
    print('start execute')
    -- Start to execute all Action methods of assembler UI elements after the user clicks 'Assemble'
    for k, v in ipairs(actions) do
        v.Action()
    end

    -- Logic part
end
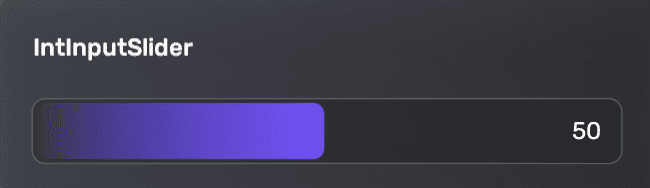
IntInputSlider
A slider that allows the user to input an integer by dragging a slider handle along a track
Preview
Code samples
-- Load the built-in assembler module in the header code
require("assembler")
-- Declare an empty table to store all assembler UI elements
-- Every new assembler UI element needs to be inserted into the 'actions' table separately
local actions = {}
-- Declare a variable "testValue" to store the user input value
local testValue

-- Render all UI elements in the 'actions' table
function render()
        -- Create a new IntInputSlider UI element with a default value of 50 and a range from 1 to 100
        local IntInputSlider = assembler:New("IntInputSlider", AssemblerUI.IntInputSlider)
        IntInputSlider.defaultValue = 50
        IntInputSlider.unit = ""
        IntInputSlider.min = 1
        IntInputSlider.max = 100

        -- Define the action to take when the user interacts with the IntInputSlider UI element
        -- This will store the user's selection in the "testValue" variable for later use
        Radio
        IntInputSlider.Action = function ()
            testValue = IntInputSlider.GetInput()
        end

        -- Add the IntInputSlider UI element into the "actions" table for execution
        table.insert(actions, IntInputSlider)

 -- Start to render all UI elements in the "actions"  table
    for k, v in ipairs(actions) do
        v:Render(k)
    end
end

-- Execute all UI elements in the "actions"  table
function execute()
    print('start execute')
    -- Start to execute all Action methods of assembler UI elements after the user clicks 'Assemble'
    for k, v in ipairs(actions) do
        v.Action()
    end

    -- Logic part
end
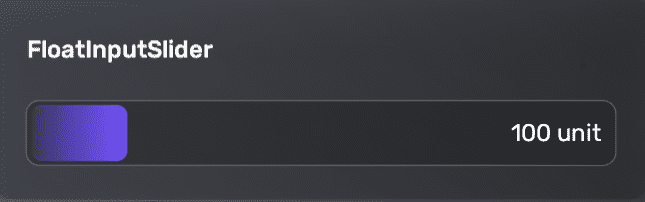
FloatInputSlider
A slider that allows the user to input a decimal number by dragging a slider handle along a track
Preview
Code samples
-- Load the built-in assembler module in the header code
require("assembler")
-- Declare an empty table to store all assembler UI elements
-- Every new assembler UI element needs to be inserted into the 'actions' table separately
local actions = {}
-- Declare a variable "testValue" to store the user input value
local testValue

-- Render all UI elements in the 'actions' table
function render()
       -- Create a new FloatInputSlider UI element with a default value of 100 and a range from 0 to 600
        local FloatInputSlider = assembler:New("FloatInputSlider", AssemblerUI.FloatInputSlider)
        FloatInputSlider.defaultValue = 100
        FloatInputSlider.min = 0
        FloatInputSlider.max = 600
        FloatInputSlider.unit = "unit"

        -- Define the action to take when the user interacts with the FloatInputSlider UI element
        -- This will store the user's selection in the "testValue" variable for later use
        FloatInputSlider.Action = function ()
            testValue = FloatInputSlider.GetInput()
        end

        -- Add the FloatInputSlider UI element into the "actions" table for execution
        table.insert(actions, FloatInputSlider)

 -- Start to render all UI elements in the "actions"  table
    for k, v in ipairs(actions) do
        v:Render(k)
    end
end

-- Execute all UI elements in the "actions"  table
function execute()
    print('start execute')
    -- Start to execute all Action methods of assembler UI elements after the user clicks 'Assemble'
    for k, v in ipairs(actions) do
        v.Action()
    end

    -- Logic part
end
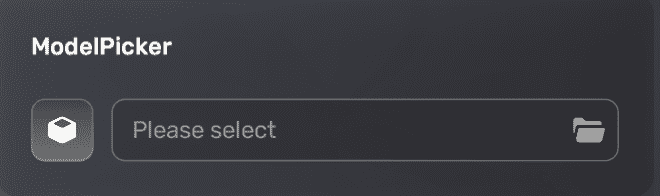
ModelPicker
A user interface element that allows the user to select a model
Preview
Code samples
-- Load the built-in assembler module in the header code
require("assembler")
-- Declare an empty table to store all assembler UI elements
-- Every new assembler UI element needs to be inserted into the 'actions' table separately
local actions = {}
-- Declare a variable "testValue" to store the user input value
local testValue

-- Render all UI elements in the 'actions' table
function render()
        -- Create a new ModelPicker UI element with a default asset ID of 27000000000
        local ModelPicker = assembler:New("ModelPicker", AssemblerUI.ModelPicker)
        ModelPicker.defaultValue = "27000000000"

        -- Define the action to take when the user interacts with the ModelPicker UI element
        -- This will store the user's selection in the "testValue" variable for later use
        ModelPicker.Action = function ()
            testValue = ModelPicker.GetInput()
        end

        -- Add the ModelPicker UI element into the "actions" table for execution
        table.insert(actions, ModelPicker)

 -- Start to render all UI elements in the "actions"  table
    for k, v in ipairs(actions) do
        v:Render(k)
    end
end

-- Execute all UI elements in the "actions"  table
function execute()
    print('start execute')
    -- Start to execute all Action methods of assembler UI elements after the user clicks 'Assemble'
    for k, v in ipairs(actions) do
        v.Action()
    end

    -- Logic part
end
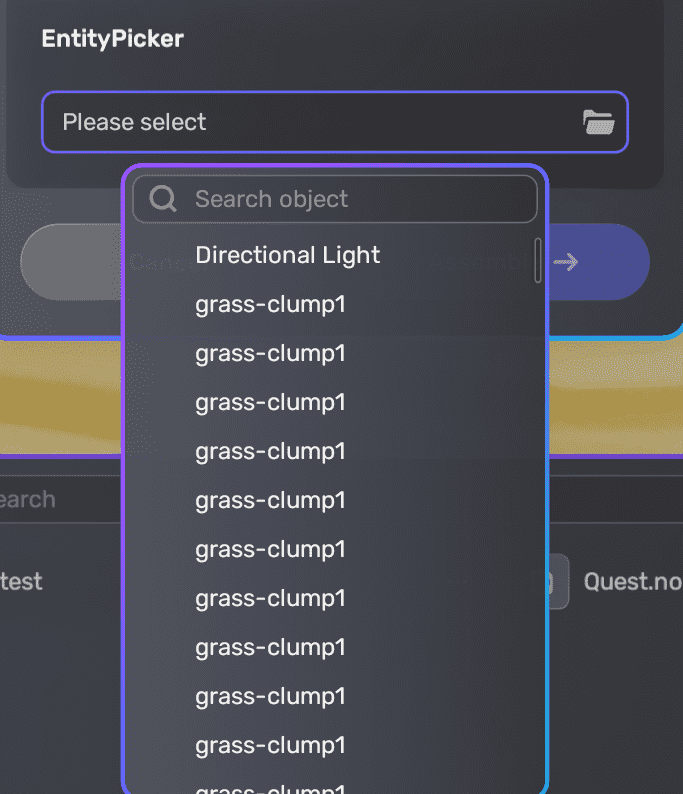
YahahaObjectPicker
A user interface element that allows the user to select a YahahaObject within the game
Preview
Code samples
-- Load the built-in assembler module in the header code
require("assembler")
-- Declare an empty table to store all assembler UI elements
-- Every new assembler UI element needs to be inserted into the 'actions' table separately
local actions = {}
-- Declare a variable "testValue" to store the user input value
local testValue

-- Render all UI elements in the 'actions' table
function render()
        -- Create a new YahahaObjectPicker UI element
        local YahahaObjectPicker = assembler:New("YahahaObjectPicker", AssemblerUI.YahahaObjectPicker)

        -- Define the action to take when the user interacts with the YahahaObjectPicker UI element
        -- Call GetNumber() to get the YahahaObject ID and store it in the "testValue" variable for later use
        YahahaObjectPicker.Action = function ()
            testValue = YahahaObjectPicker.GetNumber()
        end

        -- Add the YahahaObjectPicker UI element into the "actions" table for execution
        table.insert(actions, YahahaObjectPicker)

 -- Start to render all UI elements in the "actions"  table
    for k, v in ipairs(actions) do
        v:Render(k)
    end
end

-- Execute all UI elements in the "actions"  table
function execute()
    print('start execute')
    -- Start to execute all Action methods of assembler UI elements after the user clicks 'Assemble'
    for k, v in ipairs(actions) do
        v.Action()
    end

    -- Logic part
end
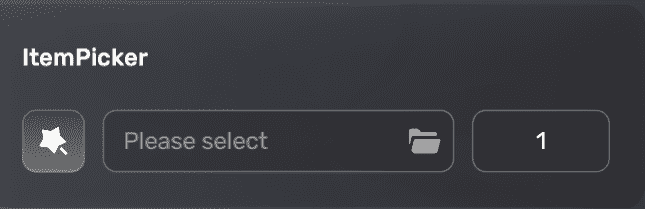
ItemPicker
A user interface element that allows the user to select an item within the game
Preview
Code samples
-- Load the built-in assembler module in the header code
require("assembler")
-- Declare an empty table to store all assembler UI elements
-- Every new assembler UI element needs to be inserted into the 'actions' table separately
local actions = {}
-- Declare a variable "testValue" to store the user input value
local testValue

-- Render all UI elements in the 'actions' table
function render()
        -- Create a new ItemPicker UI element
        local ItemPicker = assembler:New("ItemPicker", AssemblerUI.ItemPicker)

        -- Define the action to take when the user interacts with the ItemPicker UI element
        -- Call GetNumber1() to get the item ID of selected Item; call GetNumber2() to get the set amount of items.
        ItemPicker.Action= function()
            rewarded = ItemPicker:GetNumber1()
            rewardCount = ItemPicker:GetNumber2()
        end

        -- Add the ItemPicker UI element into the "actions" table for execution
        table.insert(actions, ItemPicker)

 -- Start to render all UI elements in the "actions"  table
    for k, v in ipairs(actions) do
        v:Render(k)
    end
end

-- Execute all UI elements in the "actions"  table
function execute()
    print('start execute')
    -- Start to execute all Action methods of assembler UI elements after the user clicks 'Assemble'
    for k, v in ipairs(actions) do
        v.Action()
    end

    -- Logic part
end
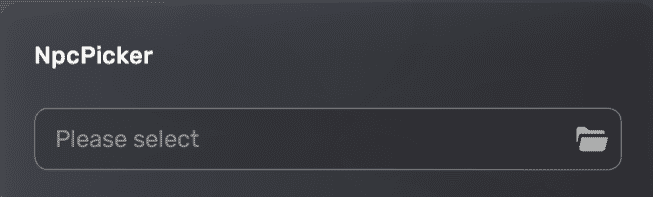
NpcPicker
A user interface element that allows the user to select an NPC (non-player character) within the game
Preview
Code samples
-- Load the built-in assembler module in the header code
require("assembler")
-- Declare an empty table to store all assembler UI elements
-- Every new assembler UI element needs to be inserted into the 'actions' table separately
local actions = {}
-- Declare a variable "testValue" to store the user input value
local testValue

-- Render all UI elements in the 'actions' table
function render()
        - Create a new NpcPicker UI element
        local NpcPicker = assembler:New("NpcPicker", AssemblerUI.NpcPicker)

        -- Define the action to take when the user interacts with the NpcPicker UI element
        -- This will store the ID of the NPC that the user selects in the "testValue" variable for later use
        NpcPicker.Action = function ()
            testValue = NpcPicker.GetNumber()
        end

        -- Add the NpcPicker UI element into the "actions" table for execution
        table.insert(actions, NpcPicker)

 -- Start to render all UI elements in the "actions"  table
    for k, v in ipairs(actions) do
        v:Render(k)
    end
end

-- Execute all UI elements in the "actions"  table
function execute()
    print('start execute')
    -- Start to execute all Action methods of assembler UI elements after the user clicks 'Assemble'
    for k, v in ipairs(actions) do
        v.Action()
    end

    -- Logic part
end
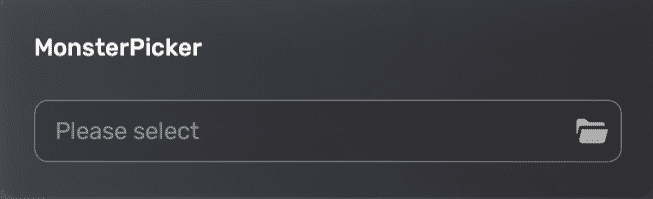
MonsterPicker
A user interface element that allows the user to select a monster within the game
Preview
Code samples
-- Load the built-in assembler module in the header code
require("assembler")
-- Declare an empty table to store all assembler UI elements
-- Every new assembler UI element needs to be inserted into the 'actions' table separately
local actions = {}
-- Declare a variable "testValue" to store the user input value
local testValue

-- Render all UI elements in the 'actions' table
function render()
        -- Create a new MonsterPicker UI element
        local MonsterPicker = assembler:New("MonsterPicker", AssemblerUI.MonsterPicker)

        -- Define the action to take when the user interacts with the MonsterPicker UI element
        -- This will store the ID of the monster that the user selects in the "testValue" variable for later use
        MonsterPicker.Action = function ()
            testValue = MonsterPicker.GetNumber()
        end

        -- Add the MonsterPicker UI element into the "actions" table for execution
        table.insert(actions, MonsterPicker)

 -- Start to render all UI elements in the "actions"  table
    for k, v in ipairs(actions) do
        v:Render(k)
    end
end

-- Execute all UI elements in the "actions"  table
function execute()
    print('start execute')
    -- Start to execute all Action methods of assembler UI elements after the user clicks 'Assemble'
    for k, v in ipairs(actions) do
        v.Action()
    end

    -- Logic part
end
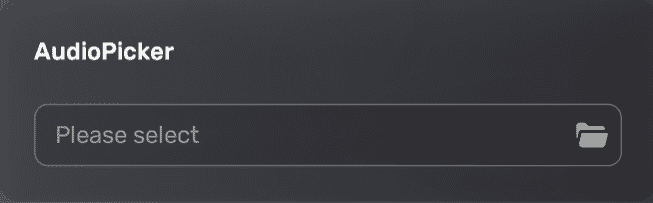
AudioPicker
A user interface element that allows the user to select an audio file
Preview
Code samples
-- Load the built-in assembler module in the header code
require("assembler")
-- Declare an empty table to store all assembler UI elements
-- Every new assembler UI element needs to be inserted into the 'actions' table separately
local actions = {}
-- Declare a variable "testValue" to store the user input value
local testValue

-- Render all UI elements in the 'actions' table
function render()
        -- Create a new AudioPicker UI element
        local AudioPicker = assembler:New("AudioPicker", AssemblerUI.AudioPicker)

        -- Define the action to take when the user interacts with the AudioPicker UI element
        -- This will store the asset ID of the audio that the user selects in the "testValue" variable for later use
        AudioPicker.Action = function ()
            testValue = AudioPicker.GetInput()
        end

        -- Add the AudioPicker UI element into the "actions" table for execution
        table.insert(actions, AudioPicker)

 -- Start to render all UI elements in the "actions"  table
    for k, v in ipairs(actions) do
        v:Render(k)
    end
end

-- Execute all UI elements in the "actions"  table
function execute()
    print('start execute')
    -- Start to execute all Action methods of assembler UI elements after the user clicks 'Assemble'
    for k, v in ipairs(actions) do
        v.Action()
    end

    -- Logic part
end
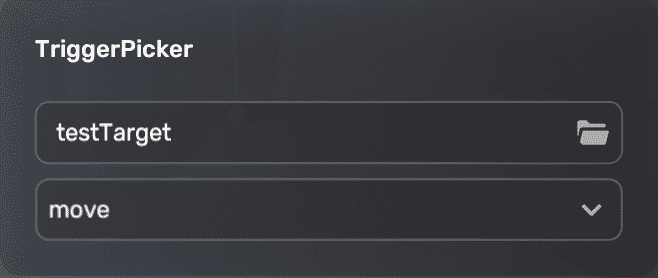
TriggerPicker
A user interface element that allows the user to select a trigger within the game
Preview
Code samples
-- Load the built-in assembler module in the header code
require("assembler")
-- Declare an empty table to store all assembler UI elements
-- Every new assembler UI element needs to be inserted into the 'actions' table separately
local actions = {}
-- Declare a variable "testValue" to store the user input value
local testValue

-- Render all UI elements in the 'actions' table
function render()
        --- Create a new TriggerPicker UI element
        local TriggerPicker = assembler:New("TriggerPicker", AssemblerUI.TriggerPicker)

        -- Define the action to take when the user interacts with the TriggerPicker UI element
        -- Call GetNumber1() to set the target ID to be triggered; call GetNumber2() to set the triggered behavior on the target.
        TriggerPicker.Action = function()
            targetID = TriggerPicker:GetNumber1()
            triggerType = TriggerPicker:GetInput2()
        end

        -- Add the TriggerPicker UI element into the "actions" table for execution
        table.insert(actions, TriggerPicker)

 -- Start to render all UI elements in the "actions"  table
    for k, v in ipairs(actions) do
        v:Render(k)
    end
end

-- Execute all UI elements in the "actions"  table
function execute()
    print('start execute')
    -- Start to execute all Action methods of assembler UI elements after the user clicks 'Assemble'
    for k, v in ipairs(actions) do
        v.Action()
    end

    -- Logic part
end
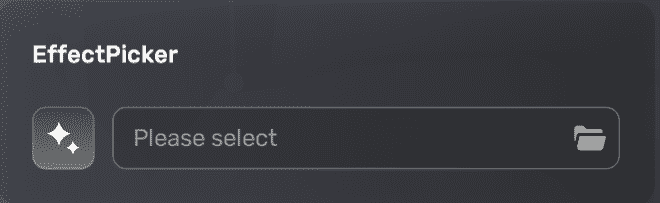
EffectPicker
A user interface element that allows the user to select a special effect within the game
Preview
Code samples
-- Load the built-in assembler module in the header code
require("assembler")
-- Declare an empty table to store all assembler UI elements
-- Every new assembler UI element needs to be inserted into the 'actions' table separately
local actions = {}
-- Declare a variable "testValue" to store the user input value
local testValue

-- Render all UI elements in the 'actions' table
function render()
        - Create a new EffectPicker UI element
        local EffectPicker = assembler:New("EffectPicker", AssemblerUI.EffectPicker)

        -- Define the action to take when the user interacts with the EffectPicker UI element
        -- This will store the asset ID of the effect that the user selects in the "testValue" variable for later use
        EffectPicker.Action = function ()
            testValue = EffectPicker.GetInput()
        end

        -- Add the EffectPicker UI element into the "actions" table for execution
        table.insert(actions, EffectPicker)

 -- Start to render all UI elements in the "actions"  table
    for k, v in ipairs(actions) do
        v:Render(k)
    end
end

-- Execute all UI elements in the "actions"  table
function execute()
    print('start execute')
    -- Start to execute all Action methods of assembler UI elements after the user clicks 'Assemble'
    for k, v in ipairs(actions) do
        v.Action()
    end

    -- Logic part
end
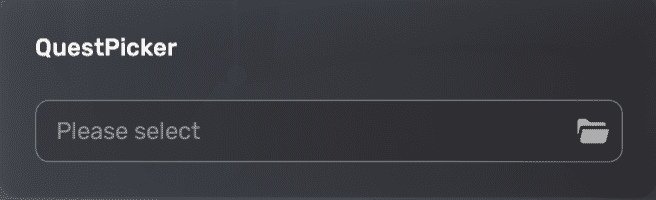
QuestPicker
A user interface element that allows the user to select a quest within the game
Preview
Code samples
-- Load the built-in assembler module in the header code
require("assembler")
-- Declare an empty table to store all assembler UI elements
-- Every new assembler UI element needs to be inserted into the 'actions' table separately
local actions = {}
-- Declare a variable "testValue" to store the user input value
local testValue

-- Render all UI elements in the 'actions' table
function render()
        -- Create a new QuestPicker UI element
        local QuestPicker = assembler:New("QuestPicker", AssemblerUI.QuestPicker)

        -- Define the action to take when the user interacts with the QuestPicker UI element
        -- This will store the quest ID that the use selects in the "testValue" variable for later use
        QuestPicker.Action = function ()
            testValue = QuestPicker.GetNumber()
        end

        -- Add the QuestPicker UI element into the "actions" table for execution
        table.insert(actions, QuestPicker)

 -- Start to render all UI elements in the "actions"  table
    for k, v in ipairs(actions) do
        v:Render(k)
    end
end

-- Execute all UI elements in the "actions"  table
function execute()
    print('start execute')
    -- Start to execute all Action methods of assembler UI elements after the user clicks 'Assemble'
    for k, v in ipairs(actions) do
        v.Action()
    end

    -- Logic part
end
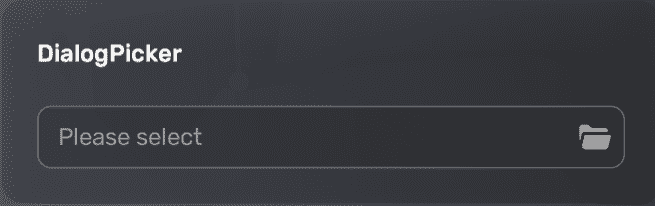
DialogPicker
A user interface element that allows the user to select a dialog within the game
Preview
Code samples
-- Load the built-in assembler module in the header code
require("assembler")
-- Declare an empty table to store all assembler UI elements
-- Every new assembler UI element needs to be inserted into the 'actions' table separately
local actions = {}
-- Declare a variable "testValue" to store the user input value
local testValue

-- Render all UI elements in the 'actions' table
function render()
        -- Create a new DialogPicker UI element
        local DialogPicker = assembler:New("DialogPicker", AssemblerUI.DialogPicker)

        -- Define the action to take when the user interacts with the DialogPicker UI element
        -- This will store the dialog ID that the user selects in the "testValue" variable for later use
        DialogPicker.Action = function ()
            testValue = DialogPicker.GetNumber()
        end

        -- Add the DialogPicker UI element into the "actions" table for execution
        table.insert(actions, DialogPicker)

 -- Start to render all UI elements in the "actions"  table
    for k, v in ipairs(actions) do
        v:Render(k)
    end
end

-- Execute all UI elements in the "actions"  table
function execute()
    print('start execute')
    -- Start to execute all Action methods of assembler UI elements after the user clicks 'Assemble'
    for k, v in ipairs(actions) do
        v.Action()
    end

    -- Logic part
end